 zerone
VitePress 从下载到部署
什么是VitePress? VitePress 是一个静态站点生成器 (SSG),专为构建快速、以内容为中心的网站而设计。简而言之,VitePress 获取用 Markdown 编写的源内容,为其应用主题,并生成可以轻松部署在任何地方的静态 HTML 页面。
简单的说它是通过Markdown快速生成静态网站,你可以拿它来制作自己的博客和技术文档,比如vite和pinia等文档都是通过VitePress(还有非常多的技术文档,多的列举不过来),更难得是还可以通过github Actions免费的部署(白嫖就是香),而且过程相当的简单,甚至因为编写的是Markdown,整个过程不需要前端、后端、数据库等(当然需要稍微懂一点前端知识)就能完成一个技术博客。
个人技术博客,又有哪个程序不爱呢?
在安装之前,有几个必备的条件;
- Node.js 版本在 18 或者更高
- 需要一定的
Markdown编写能力以及细微的前端知识
VitePress可以单独使用,也可以安装到现有项目中,这里以个人技术博客举例,创建一个全新的模版;
初始化
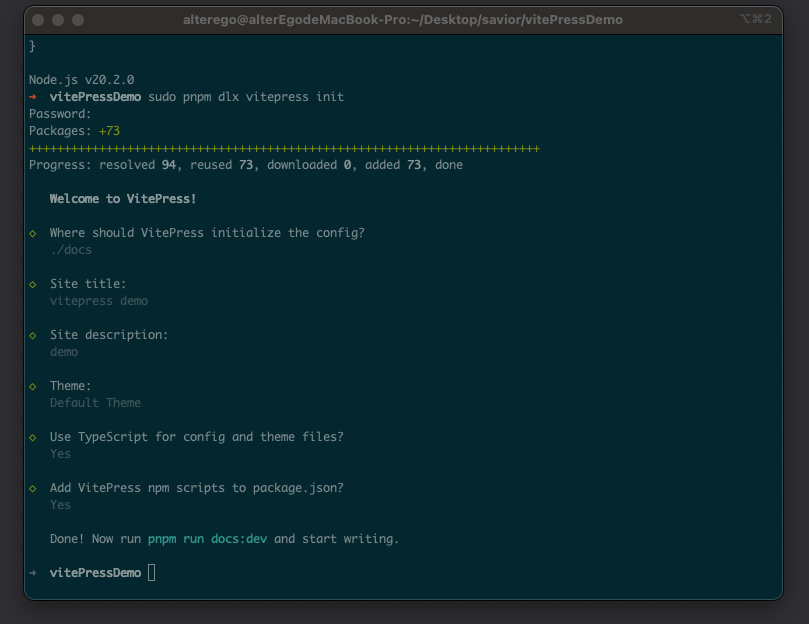
它自带一个类 Cli 的向导,可以通过这个快速完成配置(我这里使用pnpm,你也可以使用cnpm):
// pnpm 则为
pnpm dlx vitepress init

// npm | cnpm  则为
npx vitepress init
// pnpm 则为
pnpm dlx vitepress init
// npm | cnpm 则为
npx vitepress init当输入后,它会简单的问了几个问题,分别为:
where should VitePress initialze the chonfig?vitepress 应该在哪里初始化配置? 这里强烈建议设定为官方默认的./docs, 后续github Actions配置文件也会根据这个地址进行初始化,不然需要稍微折腾一下。Site title:站点标题Site description站点描述Theme:主题 (建议选择官方默认Default Theme,官方提供了漂亮的黑色与白色模式)Use TypeScript for config and theme files?对配置文件和主题文件使用 TypeScript? 推荐为 Yes,ts 简直不要太方便。Add VitePress npm scripts to package.json?是否将 VitePress npm 脚本添加到 package.json? Yes
然后进入到项目,找到package.json添加上name与vitepress包,后续github Actions 会使用,同时cnpm i全局安装依赖。
// package.json
{
  "name": "blog",
  "version": "1.0.0",
  "type": "module",
  "devDependencies": {
    "vitepress": "1.0.0-rc.12"
  },
  "scripts": {
    "docs:dev": "vitepress dev docs",
    "docs:build": "vitepress build docs",
    "docs:preview": "vitepress preview docs"
  }
}
// package.json
{
"name": "blog",
"version": "1.0.0",
"type": "module",
"devDependencies": {
"vitepress": "1.0.0-rc.12"
},
"scripts": {
"docs:dev": "vitepress dev docs",
"docs:build": "vitepress build docs",
"docs:preview": "vitepress preview docs"
}
}当完成上述后,只需要进入项目当中pnpm run docs:dev启动,你就能看到一个漂亮且简洁的VitePress模版。
文件结构
假设您选择在 ./docs 中搭建 VitePress 项目,生成的文件结构应如下所示:
.
├─ docs
│  ├─ .vitepress
│  │  └─ config.ts
│  ├─ api-examples.md
│  ├─ markdown-examples.md
│  └─ index.md
└─ package.json
.
├─ docs
│ ├─ .vitepress
│ │ └─ config.ts
│ ├─ api-examples.md
│ ├─ markdown-examples.md
│ └─ index.md
└─ package.jsondocs 目录被认为是 VitePress 站点的项目根。 .vitepress 目录是 VitePress 配置文件、开发服务器缓存、构建输出和可选主题自定义代码的保留位置。
其中,api-examples.md与markdown-examples.md为页面内容,.vitePress/config.ts为配置模块,index.md为首页。
首页配置
vitePress 的文档说的非常的详细,但一些坑点文档说的比较晦涩,难找。 所以特意列出了一些踩坑点供大家参考。
打开index.md,可以发现当前设置的首页标题,副标题等等都在这里,我们可以很简单易懂的编辑它,但这里存在一个坑吗,不容易被注意到。 features为首页最后的区块,这里的区块支持显示icon与image,我们可以根据文档说所的方式快速添加一个icon或者image,举个例子假设现在有./docs/logo.png;
---
# https://vitepress.dev/reference/default-theme-home-page
layout: home

hero:
  name: "vitepress demo"
  text: "demo"
  tagline: My great project tagline
  actions:
    - theme: brand
      text: Markdown Examples
      link: /markdown-examples
    - theme: alt
      text: API Examples
      link: /api-examples

features:
  - title: 测试图片icon
    icon: { src: "./logo.png", alt: "测试图片" }
    details: Lorem ipsum dolor sit amet, consectetur adipiscing elit
  - title: Feature B
    details: Lorem ipsum dolor sit amet, consectetur adipiscing elit
  - title: Feature C
    details: Lorem ipsum dolor sit amet, consectetur adipiscing elit
---
---
# https://vitepress.dev/reference/default-theme-home-page
layout: home
hero:
name: "vitepress demo"
text: "demo"
tagline: My great project tagline
actions:
- theme: brand
text: Markdown Examples
link: /markdown-examples
- theme: alt
text: API Examples
link: /api-examples
features:
- title: 测试图片icon
icon: { src: "./logo.png", alt: "测试图片" }
details: Lorem ipsum dolor sit amet, consectetur adipiscing elit
- title: Feature B
details: Lorem ipsum dolor sit amet, consectetur adipiscing elit
- title: Feature C
details: Lorem ipsum dolor sit amet, consectetur adipiscing elit
---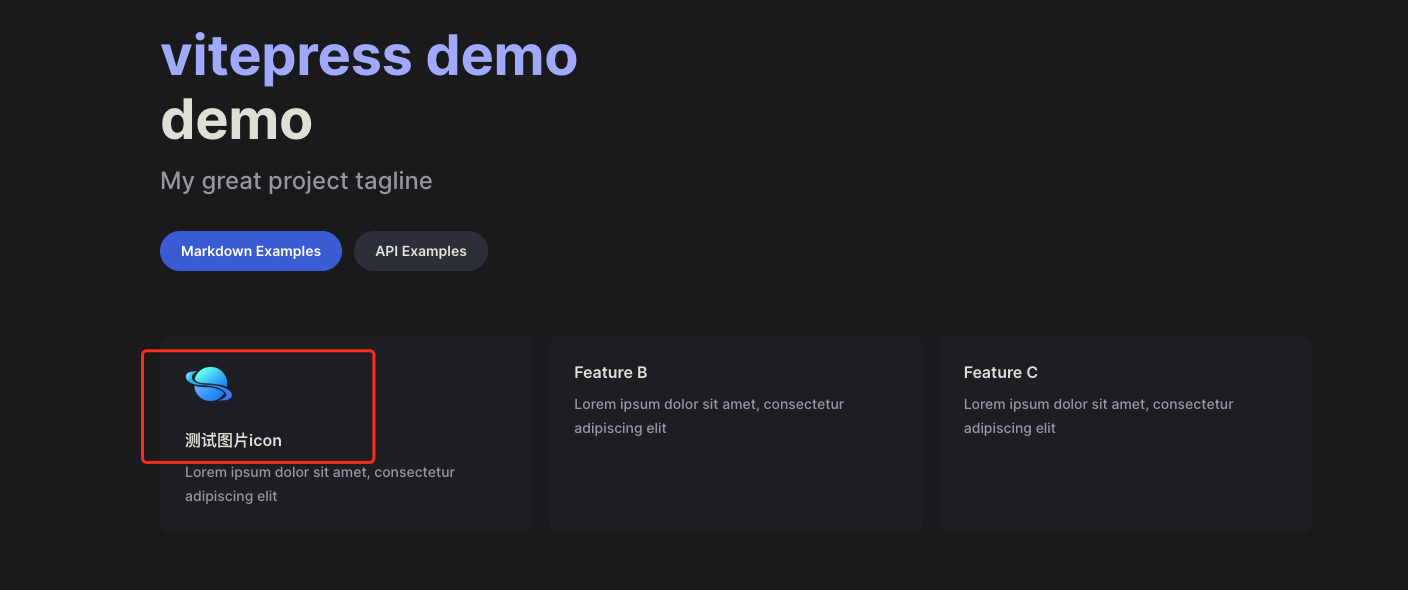
在开发环境下,首页确实渲染了该图片,没有任何问题。 但如果我们使用部署模式查看的情况下,图片则会404;
// 部署模式,先进行打包
cnpm run docs:dev

// 查看部署模式
cnpm run docs:preview
// 部署模式,先进行打包
cnpm run docs:dev
// 查看部署模式
cnpm run docs:previewwhy? 官方文档有说明:
有时,您可能需要提供在任何 Markdown 或主题组件中未直接引用的静态资源,或者您可能希望使用原始文件名提供某些文件。此类文件的示例包括 robots.txt、favicons 和 PWA 图标。 您可以将这些文件放在源目录下的 public 目录中。例如,如果您的项目根目录是./docs 并使用默认源目录位置,那么您的公共目录将为./docs/public。 放置在 public 中的资源将按原样复制到输出目录的根目录。请注意,您应该使用根绝对路径引用放置在 public 中的文件 - 例如,public/icon.png 应始终在源代码中引用为/icon.png。
说明,当前博客的静态资源(图片、视频)等,都应该在站点下的public目录中,ok,现在把logo.png存放到./docs/public中 ,重新编译发现开发环境没有问题,再打包,编译部署模式查看,就可以发现图片能正常渲染。
这里除了图片之外,官方还很贴心的支持各种Emoji表情,比如现在搓一个 🤪,首页也会渲染成功,具体支持的列表可查看官方的支持列表。
---
# https://vitepress.dev/reference/default-theme-home-page
layout: home

hero:
  name: "vitepress demo"
  text: "demo"
  tagline: My great project tagline
  actions:
    - theme: brand
      text: Markdown Examples
      link: /markdown-examples
    - theme: alt
      text: API Examples
      link: /api-examples

features:
  - title: 测试icon
    icon: 🤪
    details: Lorem ipsum dolor sit amet, consectetur adipiscing elit
  - title: Feature B
    details: Lorem ipsum dolor sit amet, consectetur adipiscing elit
  - title: Feature C
    details: Lorem ipsum dolor sit amet, consectetur adipiscing elit
---
---
# https://vitepress.dev/reference/default-theme-home-page
layout: home
hero:
name: "vitepress demo"
text: "demo"
tagline: My great project tagline
actions:
- theme: brand
text: Markdown Examples
link: /markdown-examples
- theme: alt
text: API Examples
link: /api-examples
features:
- title: 测试icon
icon: 🤪
details: Lorem ipsum dolor sit amet, consectetur adipiscing elit
- title: Feature B
details: Lorem ipsum dolor sit amet, consectetur adipiscing elit
- title: Feature C
details: Lorem ipsum dolor sit amet, consectetur adipiscing elit
---配置文件
除了首页的配置(严谨应该说编写)是在index.md之外,绝大数的配置都在./docs/.vitepress/config.ts中, 重点是themeConfig对象,它是灵魂所在。如果刚初始化,那么themeConfig则有nav与sidebar以及socialLinks。
nav 导航链接
nav则是当前站点的顶部菜单,text是导航中显示的实际文本,link是单击文本时将导航到的链接。对于链接,将路径设置为实际文件的路径,不带.md前缀,并始终以/开头。
当然的,你也可以多重嵌套(比如说官方例子):
export default {
  themeConfig: {
    nav: [
      { text: "Guide", link: "/guide" },
      {
        text: "Dropdown Menu",
        items: [
          { text: "Item A", link: "/item-1" },
          { text: "Item B", link: "/item-2" },
          { text: "Item C", link: "/item-3" },
        ],
      },
    ],
  },
};
export default {
themeConfig: {
nav: [
{ text: "Guide", link: "/guide" },
{
text: "Dropdown Menu",
items: [
{ text: "Item A", link: "/item-1" },
{ text: "Item B", link: "/item-2" },
{ text: "Item C", link: "/item-3" },
],
},
],
},
};sidebar 侧边栏
侧边栏是查看文档时候,处于左边的链接(如果你没有改布局的话)。
最简单的用法就是如此:
sidebar: [
      {
        text: 'Examples',
        items: [
          { text: 'Markdown Examples', link: '/markdown-examples' },
          { text: 'Runtime API Examples', link: '/api-examples' }
        ]
      }
],sidebar: [
{
text: 'Examples',
items: [
{ text: 'Markdown Examples', link: '/markdown-examples' },
{ text: 'Runtime API Examples', link: '/api-examples' }
]
}
],当然,它还存在一个高阶的用法,在现实的情况中,往往需要是不同内容显示不同侧边栏,为此,首先将页面组织到每个所需部分的目录中(官方例子):
.
├─ guide/
│  ├─ index.md
│  ├─ one.md
│  └─ two.md
└─ config/
   ├─ index.md
   ├─ three.md
   └─ four.md
.
├─ guide/
│ ├─ index.md
│ ├─ one.md
│ └─ two.md
└─ config/
├─ index.md
├─ three.md
└─ four.md然后,更新您的配置以定义每个部分的侧边栏。这次,您应该传递一个对象而不是数组。
export default {
  themeConfig: {
    sidebar: {
      // This sidebar gets displayed when a user
      // is on `guide` directory.
      "/guide/": [
        {
          text: "Guide",
          items: [
            { text: "Index", link: "/guide/" },
            { text: "One", link: "/guide/one" },
            { text: "Two", link: "/guide/two" },
          ],
        },
      ],

      // This sidebar gets displayed when a user
      // is on `config` directory.
      "/config/": [
        {
          text: "Config",
          items: [
            { text: "Index", link: "/config/" },
            { text: "Three", link: "/config/three" },
            { text: "Four", link: "/config/four" },
          ],
        },
      ],
    },
  },
};
export default {
themeConfig: {
sidebar: {
// This sidebar gets displayed when a user
// is on `guide` directory.
"/guide/": [
{
text: "Guide",
items: [
{ text: "Index", link: "/guide/" },
{ text: "One", link: "/guide/one" },
{ text: "Two", link: "/guide/two" },
],
},
],
// This sidebar gets displayed when a user
// is on `config` directory.
"/config/": [
{
text: "Config",
items: [
{ text: "Index", link: "/config/" },
{ text: "Three", link: "/config/three" },
{ text: "Four", link: "/config/four" },
],
},
],
},
},
};socialLinks 顶部右侧图标
为什么不把自己的 githuhb 贴出来呢? socialLinks 为顶部右侧链接图标,通常链接到github等一些列你想要链接的地址。
站点 Logo
在首页中,一般还有一个logo(官方模版中没有把 logo 配置好,之前学习绕了一大圈才实现完整的效果),在你已经把logo的图片存放到public目录中后,回到index.md首页中,在hero添加image配置,这里拿我自己博客的配置举例:
---
layout: home

hero:
  name: "zerone"
  text: "记录工作和学习中遇到的问题和get到的技能"
  tagline: 前端真实悲惨经历
  image:
    src: "../blogLogo.png"
    alt: "logo"
  actions:
    - theme: brand
      text: 进入笔记
      link: /serve/nodejs/index.md
    - theme: alt
      text: 关于我
      link: /about/me.md

features:
  - icon: ⚒️
    title: 前端开发
    details: 记录总结当前阶段前端学习的新技能和一些工作开发中遇到的问题
  - icon: 🛠️
    title: 后端开发
    details: 记录总结Node.js、Nest.js等后端的开发技术问题
  - icon: 🎮
    title: 兴趣分享
    details: 记录和分享一些游戏、书籍、电影、动漫等兴趣的爱好
---
---
layout: home
hero:
name: "zerone"
text: "记录工作和学习中遇到的问题和get到的技能"
tagline: 前端真实悲惨经历
image:
src: "../blogLogo.png"
alt: "logo"
actions:
- theme: brand
text: 进入笔记
link: /serve/nodejs/index.md
- theme: alt
text: 关于我
link: /about/me.md
features:
- icon: ⚒️
title: 前端开发
details: 记录总结当前阶段前端学习的新技能和一些工作开发中遇到的问题
- icon: 🛠️
title: 后端开发
details: 记录总结Node.js、Nest.js等后端的开发技术问题
- icon: 🎮
title: 兴趣分享
details: 记录和分享一些游戏、书籍、电影、动漫等兴趣的爱好
---顶部标题的logo也顺带安排上,打开.vitepress/config.ts,添加上 logo: '你图片的地址',ok,现在站点就有logo了。
打开搜索
搜索功能默认是关闭的,还是找到config.ts中的defineConfig,可以添加search对象,然后对其一些文本进行一些配置:
export default defineConfig({
  // ..。省略
  // 搜索
  search: {
    provider: "local",
    options: {
      locales: {
        root: {
          translations: {
            button: {
              buttonText: "搜索文档",
              buttonAriaLabel: "搜索文档",
            },
            modal: {
              noResultsText: "无法找到相关结果",
              resetButtonTitle: "清除查询条件",
              footer: {
                selectText: "选择",
                navigateText: "切换",
              },
            },
          },
        },
      },
    },
  },

  // ..。省略
});
export default defineConfig({
// ..。省略
// 搜索
search: {
provider: "local",
options: {
locales: {
root: {
translations: {
button: {
buttonText: "搜索文档",
buttonAriaLabel: "搜索文档",
},
modal: {
noResultsText: "无法找到相关结果",
resetButtonTitle: "清除查询条件",
footer: {
selectText: "选择",
navigateText: "切换",
},
},
},
},
},
},
},
// ..。省略
});更改上一页 与 下一页 以及 右侧大纲文本
这里默认是英语,可以通过配置快速更改一下
export default defineConfig({
  // ..。省略
  // 分页
  docFooter: {
    prev: "上一页",
    next: "下一页",
  },
  outlineTitle: "本页目录",
})``;
export default defineConfig({
// ..。省略
// 分页
docFooter: {
prev: "上一页",
next: "下一页",
},
outlineTitle: "本页目录",
})``;扩展样式
官方的主题样式,肯定有你不满的地方。 你可以使用自己定义的样式或者扩展其样式,扩展样式相对简单,首先创建一个样式文件,并且导出。
// .vitepress/theme/index.js
import DefaultTheme from "vitepress/theme";
import "./custom.css";

export default DefaultTheme;
// .vitepress/theme/index.js
import DefaultTheme from "vitepress/theme";
import "./custom.css";
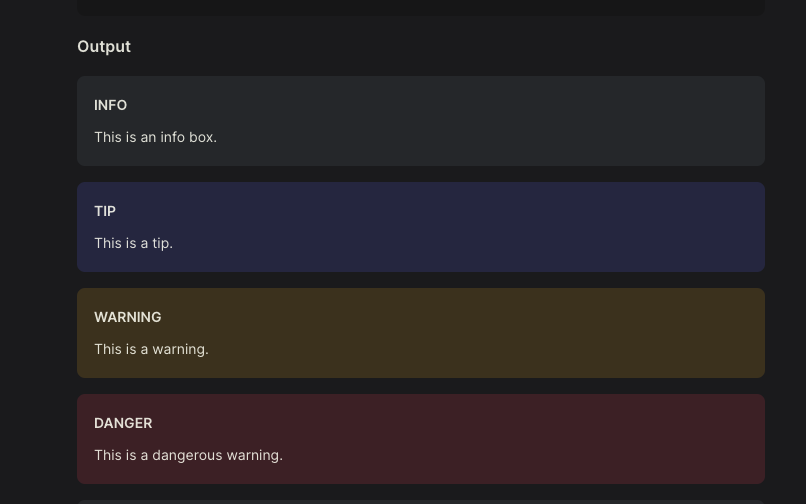
export default DefaultTheme;更改自定义容器样式
扩展也非常简单,写入对应想要更改的样式即可,自定义样式优先级比默认要高,举个例子,我不喜欢官方自定义容器的样式,一坨背景色,我想和vitepress中文文档样的自定义容器样式一样。
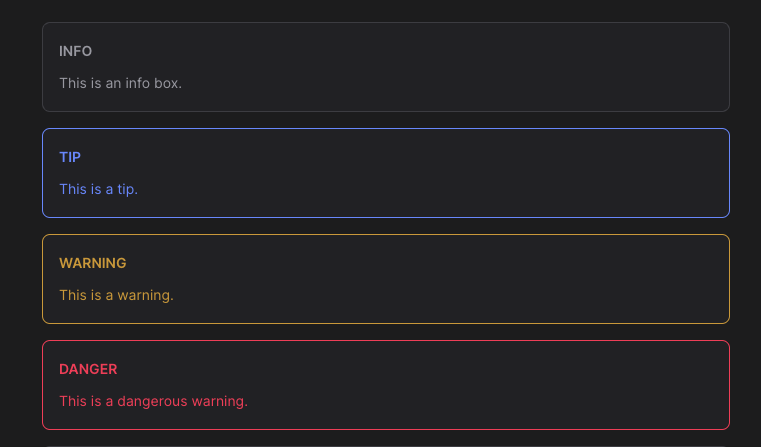
ok,我们找到对应样式直接覆盖(当然的,你可以更改对应的样式变量,我这里不想变动太多)
--vp-c-r-yellow: #f93;
    --vp-c-r-blue: #708fff;
    --vp-c-r-red: #f43f5e;

    .custom-block.warning {
      background: transparent;
      border-color:  var(--vp-c-r-yellow);
      color: var(--vp-c-r-yellow);
    }

    .custom-block.tip {
      background: transparent;
      border-color:  var(--vp-c-r-blue);
      color:  var(--vp-c-r-blue);
    }

    .custom-block.danger {
      background: transparent;
      border-color:  var(--vp-c-r-red);
      color: var(--vp-c-r-red);
}--vp-c-r-yellow: #f93;
--vp-c-r-blue: #708fff;
--vp-c-r-red: #f43f5e;
.custom-block.warning {
background: transparent;
border-color: var(--vp-c-r-yellow);
color: var(--vp-c-r-yellow);
}
.custom-block.tip {
background: transparent;
border-color: var(--vp-c-r-blue);
color: var(--vp-c-r-blue);
}
.custom-block.danger {
background: transparent;
border-color: var(--vp-c-r-red);
color: var(--vp-c-r-red);
}
为 Logo 添加官方同款高斯模糊
可以看到vite等一些官方的Logo处会有一圈漂亮的模糊,这里官方是没有配置的,只能通过更改样式进行设置,通过控制台能很快找到包裹Logo的类与样式变量,我们可以快速对其进行修改:
--vp-home-hero-name-color: transparent;
--vp-home-hero-name-background: -webkit-linear-gradient(
  120deg,
  #ed9e38,
  #2457f1
);
--vp-home-hero-image-background-image: linear-gradient(
  -45deg,
  #ed9e38 50%,
  #2457f1 50%
);
--vp-home-hero-image-filter: blur(72px);
--vp-home-hero-name-color: transparent;
--vp-home-hero-name-background: -webkit-linear-gradient(
120deg,
#ed9e38,
#2457f1
);
--vp-home-hero-image-background-image: linear-gradient(
-45deg,
#ed9e38 50%,
#2457f1 50%
);
--vp-home-hero-image-filter: blur(72px);
部署到 github
“白嫖一时爽,一直白嫖一直爽!” github提供了github pages强大的功能让我们能部署静态站点。部署之前还需要确定一下以下几点,假设:
VitePress站点位于项目的docs目录内。 (你设定的站点为./docs)- 正在使用默认的构建输出目录(
.vitepress/dist)。 (打包输出目录) VitePress作为本地依赖项安装在您的项目中,并且您已在package.json中设置了以下脚本:
{
  "scripts": {
    "docs:build": "vitepress build docs",
    "docs:preview": "vitepress preview docs"
  }
}
{
"scripts": {
"docs:build": "vitepress build docs",
"docs:preview": "vitepress preview docs"
}
}npm run docs:build以及npm run docs:preview查看页面并没有异常。- 需要一个
github账号
当上述的条件都符合的情况下,去
github创建一个仓库,仓库名称需要命名为账号名.github.io,否则最终部署后路由地址将是<账号名.github.io/你写的地址>,会导致样式无法正常加载,当然可以通过配置文件进行解决,但如果不是同一账号下多个 github pages 站点,建议使用库名为账号名.github.io,且库需要是公开(有钱可以氪金选择不公开), 受不可抗力因素,github 会出现间隙性或者长时间无法登陆或者请求无法响应,没有 xx 上网的情况下,只能硬等。 或者建议更换一些节点缓解这一类的情况。当创建库成功后,回到项目创建
.github/workflows/deploy.yml,当然先把代码提交到库后在github上添加也行,不过碍于没有 xx 上网,先从本地创建是一个好办法。
该yml文件就是自动化脚本,它在提交代码后会自动打包部署到github pages,官方文档也有贴出给我们复制(不过你可能需要稍微改一下yml打包的方式),下面是我博客的yml配置,和官方唯一不同就是我指定了打包的形式为yarn,直接复制即可。
特别需要强调,github 部署需要对应 yml 打包方式的版本控制文件,比如 npm | cnpm 的 package.lock.json , yarn 的 yarn.lock,如果代码库中没有这个文件将无法部署
# Sample workflow for building and deploying a VitePress site to GitHub Pages
#
name: Deploy VitePress site to Pages

on:
  # Runs on pushes targeting the `main` branch. Change this to `master` if you're
  # using the `master` branch as the default branch.
  push:
    branches: [main]

  # Allows you to run this workflow manually from the Actions tab
  workflow_dispatch:

# Sets permissions of the GITHUB_TOKEN to allow deployment to GitHub Pages
permissions:
  contents: read
  pages: write
  id-token: write

# Allow only one concurrent deployment, skipping runs queued between the run in-progress and latest queued.
# However, do NOT cancel in-progress runs as we want to allow these production deployments to complete.
concurrency:
  group: pages
  cancel-in-progress: false

jobs:
  # Build job
  build:
    runs-on: ubuntu-latest
    steps:
      - name: Checkout
        uses: actions/checkout@v3
        with:
          fetch-depth: 0 # Not needed if lastUpdated is not enabled
      # - uses: pnpm/action-setup@v2 # Uncomment this if you're using pnpm
      - name: Setup Node
        uses: actions/setup-node@v3
        with:
          node-version: 18
          cache: yarn
      - name: Setup Pages
        uses: actions/configure-pages@v3
      - name: Install dependencies
        run: yarn install
      - name: Build with VitePress
        run: yarn docs:build
      - name: Upload artifact
        uses: actions/upload-pages-artifact@v2
        with:
          path: docs/.vitepress/dist

  # Deployment job
  deploy:
    environment:
      name: github-pages
      url: ${{ steps.deployment.outputs.page_url }}
    needs: build
    runs-on: ubuntu-latest
    name: Deploy
    steps:
      - name: Deploy to GitHub Pages
        id: deployment
        uses: actions/deploy-pages@v2
# Sample workflow for building and deploying a VitePress site to GitHub Pages
#
name: Deploy VitePress site to Pages
on:
# Runs on pushes targeting the `main` branch. Change this to `master` if you're
# using the `master` branch as the default branch.
push:
branches: [main]
# Allows you to run this workflow manually from the Actions tab
workflow_dispatch:
# Sets permissions of the GITHUB_TOKEN to allow deployment to GitHub Pages
permissions:
contents: read
pages: write
id-token: write
# Allow only one concurrent deployment, skipping runs queued between the run in-progress and latest queued.
# However, do NOT cancel in-progress runs as we want to allow these production deployments to complete.
concurrency:
group: pages
cancel-in-progress: false
jobs:
# Build job
build:
runs-on: ubuntu-latest
steps:
- name: Checkout
uses: actions/checkout@v3
with:
fetch-depth: 0 # Not needed if lastUpdated is not enabled
# - uses: pnpm/action-setup@v2 # Uncomment this if you're using pnpm
- name: Setup Node
uses: actions/setup-node@v3
with:
node-version: 18
cache: yarn
- name: Setup Pages
uses: actions/configure-pages@v3
- name: Install dependencies
run: yarn install
- name: Build with VitePress
run: yarn docs:build
- name: Upload artifact
uses: actions/upload-pages-artifact@v2
with:
path: docs/.vitepress/dist
# Deployment job
deploy:
environment:
name: github-pages
url: ${{ steps.deployment.outputs.page_url }}
needs: build
runs-on: ubuntu-latest
name: Deploy
steps:
- name: Deploy to GitHub Pages
id: deployment
uses: actions/deploy-pages@v2- 初始化
git,提交代码
ok,剩下就是正常提交代码去git了,我们指定线上为main分支(更改的话,你需要对应去更改yml文件),建议使用命令方式提交,没有 xx 上网的情况下,可视化工具一般无法提交成功,我自己用 sourcetree 就没有成功过一次,反而命令能偶尔成功提交。
git init
git add README.md
git commit -m "first commit"
git branch -M main
git remote add origin git库地址
git push -u origin main
git init
git add README.md
git commit -m "first commit"
git branch -M main
git remote add origin git库地址
git push -u origin main当一切都提交好后,登陆github查看是否提交完成。
- 设置
github pages
在github菜单中点击settings --> pages , 我们选择github Actions即可。
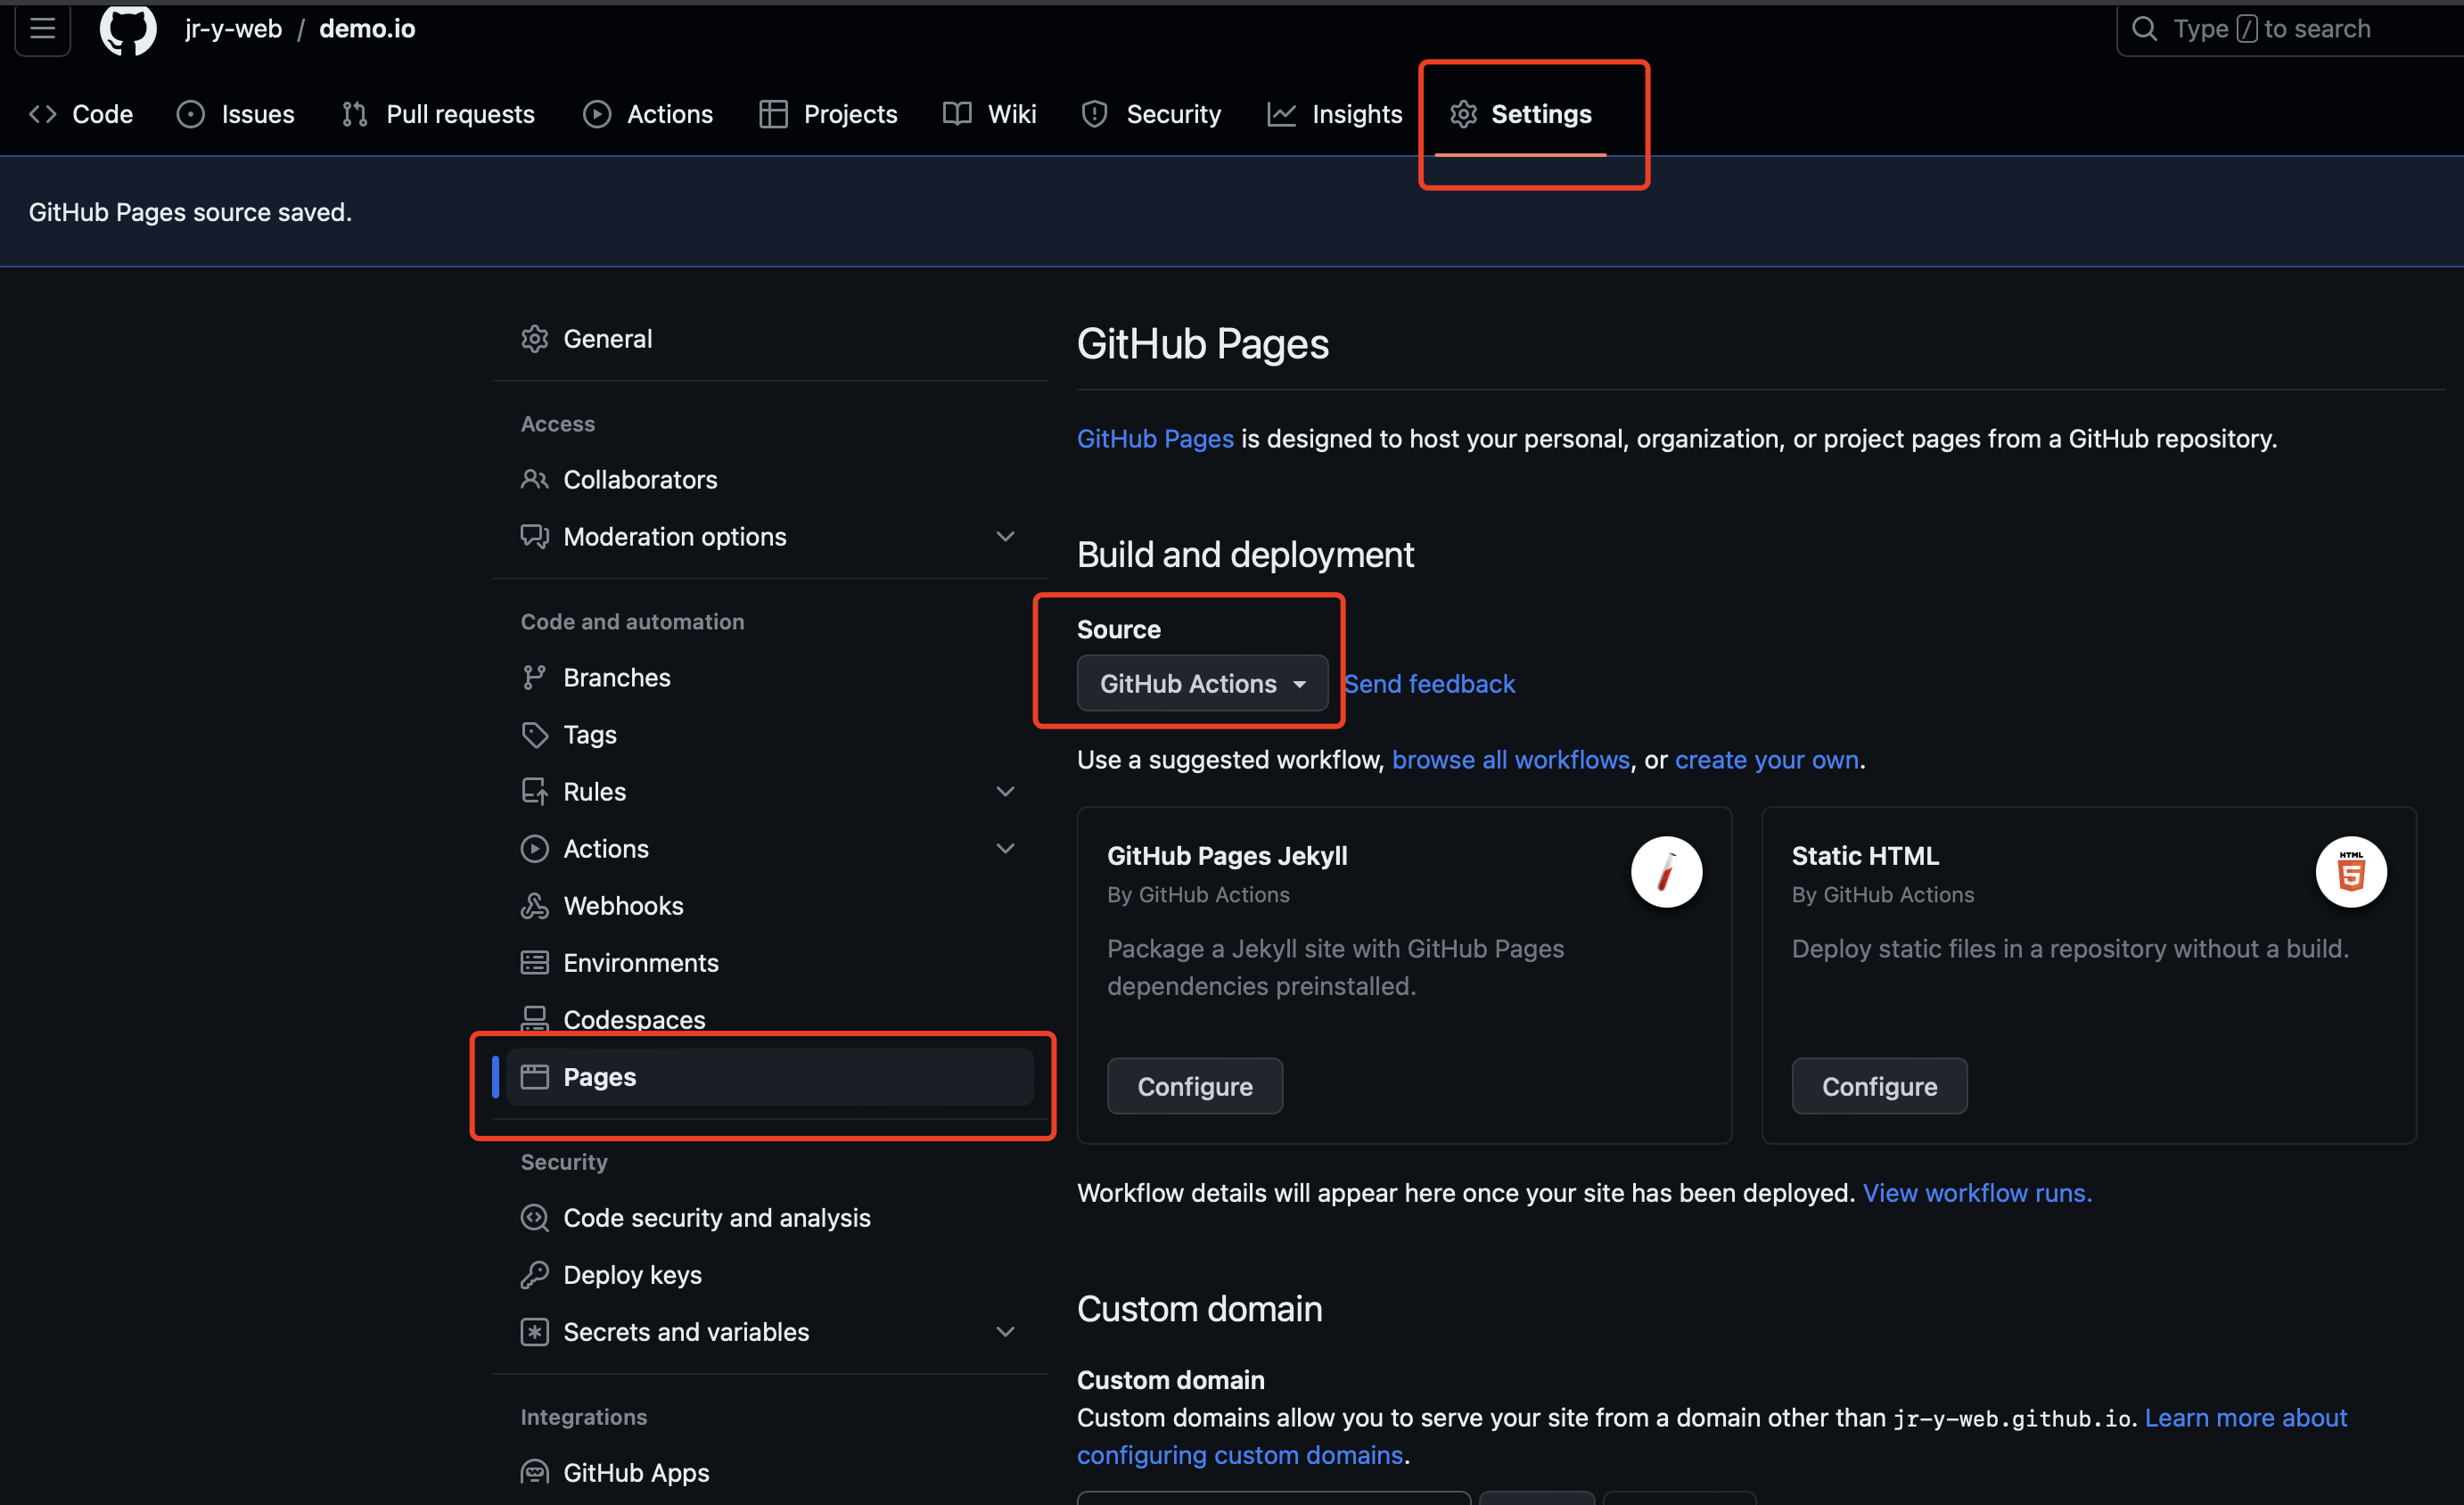
ok,再让我们触发一次提交。
当提交成功后,可以去顶部菜单Actions查看这次部署是否成功,如果报错的情况,它会提供相应的报错信息,如果没有报错,点击顶部菜单settings,然后侧边栏pages,它将在几秒中后部署完成,并且输出你站点的地址。
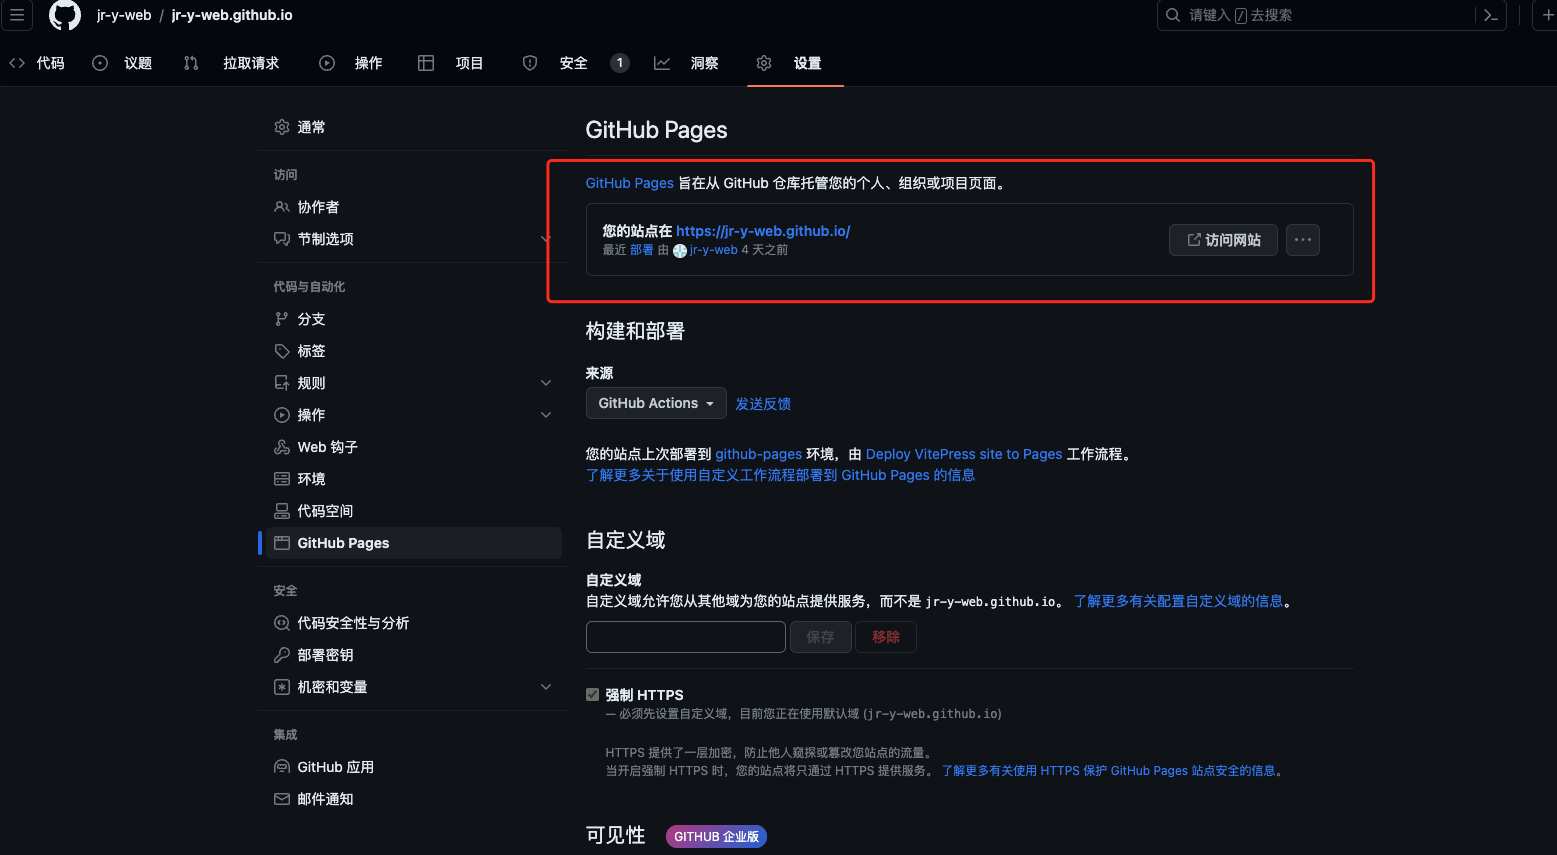
那剩下的就是自己的创作空间了,每次提交推送成功后,github pages 会自动部署,并且部署后地址不会受到来自不可抗力的 DNS 污染,讲人话就是能丝滑浏览,博客就此初始化完成,后续只需要结合官方文档就可以做一下不一样的配置。
如果你按流程也成功创建了自己的博客,不如给我的github打一个stars🤪? 在工作不忙的情况下也会偶尔分享一些自己的兴趣爱好,和前端学习笔记真实的挣扎经历。